I thought I would share what I have been doing in the past two days... yup... two days! People have often commented on the colours I use in my paintings and journals, something I think I take for granted, but I also get stuck sometimes. I have a colour palette that I use most of the time but every now and again I want to try something different.
When I am doing a painting, I NEVER use colour straight out of the tube, I always mix my own. If for example I want to use a cadmium yellow, rather than use it straight from the tube I will mix my reds into a lemon yellow until I get the golden yellow I want to use. I never use primary colours either and I like to mix all my own greens, I don't know why but I just enjoy the journey and often end up with colours that I wouldn't be able to duplicate again :o)
I had a whole lot of paint swatches and decided yesterday to make my own colour wheel and samples of colour palettes that I really enjoy working with. I hope you can get something out of me sharing this with you.
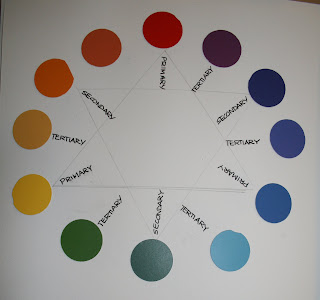
Cutting all the paint swatches into circles, make up a colour wheel using Primary, Secondary and Tertiary colours.

On a second colour wheel, add the analogous colours, which is the colour on either side of an existing colour, which gives you more shades from yellow to red, from red to blue and from blue to yellow. For example you have more choice of yellows and oranges, reds and purples, blues and turquoise greens.
An analogous colour can be any two colours on either side of a colour, where as the intermediate colours are two colours either side of a primary colour.

Normally what I do when I see a picture or painting that I like the palette of colours, I will cut the picture out of the magazine or if I see it on the internet I will use my Prisma colour pencils and make a sample of the colours in one of my journals. These are just some of them. In the sample below, the palette of colours on the right is Red, Olive and Forrest Green, but the little sample of Apple Green can be added in small quantities to give the highlights. Oh and that's another thing, I try not to use pure white or black in my paintings unless I absolutely have to. My black is more often than not a very dark burgundy and my whites always have a touch of yellow, blue, or lilac. I will talk about Grey in just a moment.

Examples of three pictures cut out from magazines and the colour palette next to it.

We all know about Warm, yellows oranges, rust and Cold colours, pinks, blues and purples, but you can also have a cold orange by adding a little magenta or one could have a warm mauve by adding a little yellow. So be aware of what results you want to achieve, cool or warm?

Samples of colour palettes cut out of books and magazines. Colours that work well together are your primary colours used alongside the opposite complimentary colours, for example Red and green, Blue and orange, yellow and purple.

This is my own colour wheel. Although introducing the green as a complimentary colour it gives me the various shades of green and turquoise, so when I am working I work from this colour sample.
The reds and oranges are called Monochromatic colours which in themselves work well in artwork but adding a touch of a complimentary colour really brings things to life.

After I made the colour wheel with the Paint swatches I then tried to match up the same colours using paints. You can see from the Orange around to the purple it is very difficult to see the difference between the colours. Changing the Primary colours a shade or two will alter your oranges and your purples considerably.
Have you ever become really annoyed when you are painting and your colours seem to get muddy! well you can see from the sample of water ... that's what happens when you mix all the colours. So if your painting is becoming muddy your colours are becoming contaminated. Try to stick to 3 colours when mixing a 4th colour and it will help to keep your colours pure. Also keep your water or your turps clean.

When I finished playing with all these colours I took my paintbrush and mixed all these colours together on the plate I was using and as you can see... you get that nice dirty muck, which is NOT grey, it is mud.
Grey shadows are reflections of objects at different times during the day depending on the light and the season. I learned something very interesting many years ago when I did an art class. I was told that in the desert, the shadows are cool which makes the oranges and warmth of the sand look even warmer and in the snow the shadows can be made warmer it makes the snow look even colder. Of course we know that painting whites, in wedding dresses, or in snow etc there will be shades of lilac and blue greys, but adding a warmer grey it will make your whites look even whiter.
Keep watching for a discussion on Grey...that bland colour that can look so beautiful.
Well that is your colour lesson for today. ;o)